Overview
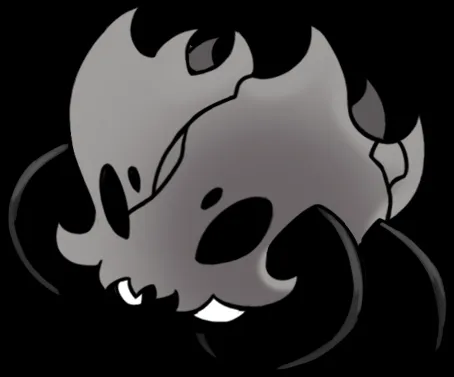
The Skull Tyrant is a massive armored beast found in The Marrow during Act 1 of Hollow Knight: Silksong. Despite its intimidating appearance, it's one of the more straightforward bosses in the game — if you come prepared with the right tools. The Skull Tyrant is fought twice: first in The Marrow, then again in a surprise rematch at Bone Bottom. Both fights use similar tactics, but the second encounter adds a twist.
How to Reach the Skull Tyrant
First Encounter: The Marrow
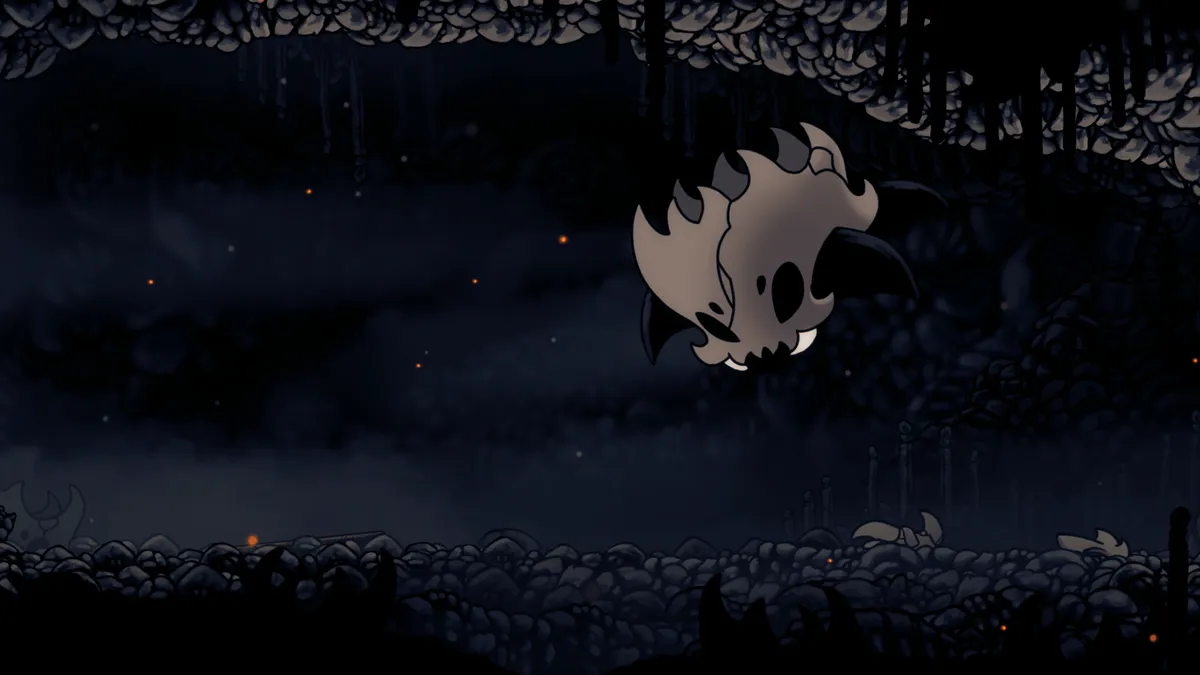
The Skull Tyrant is located west of the Bench in The Marrow, in the same room as the Fleamaster's traveling caravan. To access this fight:
- Accept the Terrible Tyrant quest from the Bone Bottom Wishwall
- Acquire the Cling Grip from Shellwood — required to access this stretch of The Marrow
- Navigate to the secret area in The Marrow
When you first approach, the Skull Tyrant is dormant under its shell. Strike the skull mask to rouse it, and the fight begins. On subsequent attempts, it drops from the ceiling and roars.
Second Encounter: Bone Bottom
After defeating the first Skull Tyrant, you'll receive the Crown Fragment. When you return to Bone Bottom to turn it in, the Skull Tyrant attacks the settlement in a surprise rematch. If it doesn't spawn immediately, leave and re-enter the area.
Attack Patterns
Bull Charge
Visual Cue: The Skull Tyrant starts running.
It charges across the arena like a bull. Jump over it and get in a Pogo slash or two as it passes underneath. The arena is large enough to give you plenty of room to dash away. After charging, the boss takes a few seconds before its next attack — this is your main damage window.
Leap
Visual Cue: The Skull Tyrant starts to wiggle.
It leaps into the air and tries to land on you. Back up or dash under it as it jumps. Don't stand still — the landing hitbox is generous.
Boulder Rain
Visual Cue: The Skull Tyrant roars.
It summons falling boulders from the ceiling. Look up and position yourself between the falling rocks. Keep moving and avoid standing in one spot too long.
Skull Slam
A close-range headbutt attack. The Skull Tyrant slams its armored skull into the ground in front of it. Jump or dash backward to avoid it, then rush in for hits during the recovery.
Battle Strategy
The Longpin Advantage
Here's the crucial tip: the Skull Tyrant has armor. Most tools will bounce off or deal partial damage. The Longpin is the only offensive tool that deals full damage due to its armor-piercing properties. Make sure you pick it up from Shellwood before this fight. The boss's large size makes it nearly impossible to miss with the Longpin.
General Approach
- Jump over charges and Pogo off its back for free damage
- Punish after charges — the recovery window is generous, giving you time for regular attacks or Silkspear strikes
- Stay mobile during boulder rain — don't panic, just keep moving
- Use the arena space — the arena is fairly large, giving you room to dash away from all attacks
Pogo Strategy
The Skull Tyrant's back is prime pogo territory. Jump over its charge, bounce off its skull or back, and you can get in consistent damage while staying safe from most ground-level attacks.
Bone Bottom Strategy (Second Fight)
The second encounter adds NPCs to the arena that the Skull Tyrant can hurt. The strategy is the same, but you'll want to position yourself to keep the fight away from the Bone Bottom residents. If you bait the Tyrant away from the NPCs, you can focus purely on the fight.
A popular cheese strategy: if you bait the Skull Tyrant off the ledge, you can dip in and out of the marked zone, dealing damage while remaining largely safe from its attacks.
Recommended Build
Tools
- Longpin (Essential) — Armor-piercing; full damage against the Skull Tyrant
- Silkspear — Good ranged option for punishing after charges
- Warding Bell — Safety net for unexpected hits
Crests
- Wanderer's Crest — Faster attack speed helps maximize damage during windows
- Beast Crest — If you've already obtained it, the lifesteal Bind is useful
Silk Skills
- Any silk skill works; Silkspear throw is particularly effective at range
Pro Tips
- Strike the dormant skull to start the fight — you get a free hit
- You can set up traps around the arena before initiating the fight
- The Longpin is non-negotiable — get it from Shellwood before attempting this boss
- Pogo off its back consistently for safe, reliable damage
- The boss arena is large — use all of it; don't get cornered
- For the Bone Bottom rematch, the same tactics apply but with added environmental awareness
Rewards
- First Encounter: Crown Fragment
- Second Encounter: Completing the Terrible Tyrant quest line, plus access to additional Bone Bottom content
Wrapping Up
The Skull Tyrant looks scarier than it actually is. Its attacks are well-telegraphed, the arena is spacious, and the Longpin makes armor a non-issue. Jump over charges, pogo off its back, and punish during recovery windows. The second fight at Bone Bottom is more of the same with a fun narrative twist.
Don't let the size intimidate you, Hunter. Big targets are easy targets.